This is a list of useful programs/applications that you can use to help capture screen activity when reporting bugs and troubleshooting with Brave Support.
This page has also been made a “Wiki” page so that anyone with a useful tool or tip can add it to the list. A few ground rules to stick by when adding resources:
- All the tools listed here should be free and/or open source.
- Always include a link to the to the creator/developer’s website.
- Try to pick tools and software that are easiest to use and quickest to setup. Users of all skill levels and backgrounds roam Community – the idea of this thread is to make the support process easier.
- No tom-foolery! This thread serves one purpose only – any edits that deviate from that purpose will be deleted and the user flagged.
Screen Recording
LICEcap
(Windows, macOS)
Free, open source application used to capture and record screen activity. Many Brave employees use this due to its simplicity and quick production. Appears to be Catalina-compatible despite reports of incompatibility (see post below for more info).
How to use Licecap:
- Once installed, launch LICEcap and resize the window frame as desired.
- Hit
Recordand choose a destination for the file output. - After the pre-roll countdown (you can turn this on/off/change it’s length in LICEcap settings), any screen activity that occurs inside the window frame will be captured.
- Hit
Stopwhen you’re done recording and the recording you just took will automatically be saved to the destination you selected in.gifformat.
If LICEcap on macOS gives black boxes:
Comment by hnktong
Today (16 Jan 2020) my LICEcap started recording all black on macOS 10.14.6. Mucking about I got it working again, but I’m not positive that anything I did actually fixed it. If you don’t want to bother with the stuff below, try Kap, or if you haven’t upgraded to 10.15/Catalina, try GIPHY Capture, which is used pretty much the same way as LICEcap. It’s very intuitive and easy.
To get LICEcap to stop it with the black boxes, several “fixes” are floating out there based on this article and some additional research:
- Try to free up RAM by quitting things, including background processes using Activity Monitor. (It might be a memory issue, but this is disputed.)
- Try using LICEcap on only your main display/monitor. (This as cause is disputed because of reports from MacBook users getting black recordings with no external monitor attached, but the code for the capture window uses mainDevice all over the place, so can’t hurt to try using your main monitor if you have more than one.)
- Try giving LICEcap control under Accessibility. The thought is that LICEcap might be refused access by the process you’re trying to record. If you want to give Accessibility a shot (based on 10.14.6 so your interface might differ a bit):
i. Open System Preferences, click Security & Privacy, click the Privacy tab.
ii. Click Accessibility in the list on the left, click the lock in the bottom left to make changes, and enter password.
iii. Click the + button under the app list on the right, find LICEcap in the Applications folder with the dialog that pops up, select it, and click OK/Select.
Kap
(macOS)
Open source Kap has more features than LICEcap without being much more complicated to use, yet is still free. Kap can record a selected rectangular area, a specific window of an application, or an entire screen in GIF, MP4, WebM, or APNG.
More info about Kap
Discovered when reports suggested that LICEcap 1.29 was not Catalina-compatible, Kap enables you to designate a particular rectangular area to record, select a specific window of an application, or record an entire screen in GIF, MP4, WebM, or APNG. For this forum, GIF is preferred, though MP4 can be used. Kap was just updated in December 2019, is built with javascript/Electron, and includes plugins/API that allow sharing via a bunch of cloud services, though none are required. Its project page on github has additional information.
How to use Kap (like LICEcap):
-
Once installed, launch Kap. It will sit in your menu bar and will show in your Dock, too.


-
Select some defaults by right-clicking the menu bar icon and selecting “Preferences…”

You can choose whether to show the pointer/cursor, highlight clicks, use keyboard shortcuts, and hide desktop icons. The Plugins tab allows connection to a bunch of cloud services.

-
Click the menu bar icon to invoke the recording interface.
-
Select the crop icon (leftmost) for area selection, the window button (to right of crop icon) to select application/window, or full screen button (to right of red circle record button). Area selection will highlight the last-used or default rectangle that can be dragged and resized. The right-most icon (the three dots) calls the menu you get by right-clicking the menu bar, including Preferences.
-
Hit “Record” button (center circle). The screen will remain darkened for a few seconds as a countdown so you can get to what you want recorded. Once it lightens, proceed with what you want recorded. You might have to switch to the application to be recorded (true in LICEcap, too). Note that the menu bar icon will have a dot in it to indicate recording.

-
Click the menu bar icon to stop recording. The recording you just took will be presented in an Editor window. Here you designate desired export dimensions (WxH in pixels), FPS, format, and where/how to save/share the movie, hitting “Export” when satisfied. For upload here, keep the final file size under 4MB by lowering FPS to 5-15, export width/height under 600, and use GIF (I’ve gotten away with 6MB, but try not to push it). For example, this demo is a 10 FPS, 600x299 GIF for 1.7MB:

Here are stills:
-
An Exports window will appear showing progress. When done, click the entry of the file to open a Finder window or click the preview to access the original.


Peek
(Linux - many distros)
Note: There is a macOS application called Peek, but it is NOT the same one.
Free, open source application used to capture and record screen activity. It works almost exactly like LICEcap, maybe even easier. Installation varies with distro, but the website includes instructions for many distros. In addition to animated GIFs, it can record in APNG, WebM, and MP4 formats. You can change default format in Preferences (accessed by clicking Peek icon in upper left of Peek window).
How to use Peek:
- Once installed, launch Peek and resize the window frame as desired and select output format if you don’t want it in GIF.
- Hit
Record. - After the pre-roll countdown (you can turn this on/off/change it’s length in Peek settings), any screen activity that occurs inside the window frame will be captured.
- Hit
Stopwhen you’re done recording. Peek will render the recording. - Choose a destination for the file output. The recording will be saved to the destination you selected in
.gifformat.
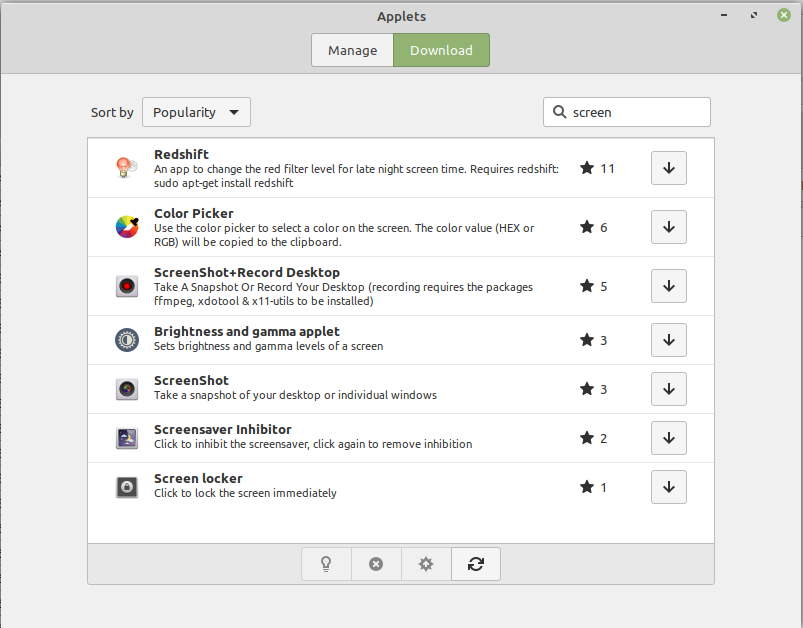
ScreenShot+Record Desktop Applet
(Linux - not sure how many distros, but at least in Ubuntu-based with Panel)
Free, open source applet used to take screenshots and capture and record screen activity. A little camera icon sits in your panel and you click it when you want to use it. My guess it it simply invokes some built-in functions from a convenient access point and adding some scripting.
How to Get/Use ScreenShot+Record Desktop Applet:
- Install prerequisites: open a terminal (Ctrl-Alt-T) and enter the command
apt install ffmpeg xdotool x11-utils. - Right-click your panel, select Applets.
- Click Download button at top of Applets window and type Screenshot+Record in the search box.
- Click install (down arrow), go through whatever procedure it yields, and the icon should show up when you’re done.

- To use, click the camera icon and select what you want to do.

- When your selected method of capture is done, if it’s a screenshot you’ll be prompted to copy to clipboard or save it, and if it’s a recording, it should be saved in your Pictures/Videos folder. Be sure so install ffmpeg, xdotool, and x11-utils per the instructions on the web site.
Screenshot/Capture
The default Print Screen function on your system is perfectly suited for this task. macOS and Windows 10 both have the ability to capture the whole screen, active window, or area you specify, plug both allow you to annotate/edit, designate custom save location, copy to clipboard, and more. However, if you’re looking for something not built-in, possibly with more functionality, there are a couple other options out there you may want to try:
Lightshot Screenshot
(MacOS)
Free, open source screen capture application that comes with additional features (pretty much the same as the OS builds in with Shift-Cmd-4), such as:
- Drag-and-drop resizing of the capture area as opposed to capturing the entire screen. This eliminates the need to crop your image separately once its captured.
- Annotation tools to mark the captured screenshot directly without leaving the app.
- Easily copy or save the image directly from app
Snipper Tool
(Windows)
This tool comes standard on the Windows 7, 8/8.1, and 10 Operating Systems and is surprisingly powerful. Additional features include:
- Allows user to select type of screen they’d like to capture (whole screen, specific window, etc)
- Built-in annotation tools and button to open the image in Windows Paint 3D program for further editing if desired.
- Easy to save or copy/paste directly from app
ShareX
(Windows)
Free, open source tool to capture full screen or regions, record video and gif and allows you to upload the capture area or video for easy sharing. The capture process can also be task driven to automate parts of the process.


